DIY Sprinkler System Repair: Essential Tips for Homeowners - SPRINKLER SYSTEMS OF SANANTONIO
DIY Sprinkler System Repair: Essential Tips for Homeowners
When you notice your lawn looking less vibrant or your water bill creeping up, it might be time to check your sprinkler system for needed repairs. Tackling issues like leaky valves or clogged nozzles yourself can save you a bundle and ensure your lawn stays lush. You’ll need a few basic tools and some patience, but with a step-by-step approach, you can handle the most common problems. However, some repairs might reveal deeper issues that require a more detailed understanding. So, where do you start, and how do you ensure you’re not causing more harm than good?
Identifying Common Problems
To effectively troubleshoot your sprinkler system, you’ll need to recognize the most frequent issues, such as leaky valves, clogged nozzles, and uneven water distribution. Let’s delve into how you can master the art of troubleshooting leaks and diagnosing blockages, ensuring your lawn receives optimal irrigation.
Firstly, identifying and addressing leaky valves requires a systematic inspection. Start by observing any unusual wet spots or pooling water in your lawn when the system is off. This often indicates a valve isn’t closing completely. It’s crucial to examine the valve diaphragm for debris or wear, as these are common culprits.
Next, diagnosing blockages in the nozzles demands a keen eye. Signs of clogged nozzles include weak water flow or spraying in an unintended direction. Turn off the system and remove the nozzle. Look for dirt or small stones obstructing the water passage. It’s effective to routinely clean the filters inside the nozzles to prevent recurrent issues.
Lastly, uneven water distribution often stems from misaligned sprinkler heads or pressure discrepancies. Verify that each head is properly oriented and adjust the pressure settings if necessary to maintain uniform coverage across your landscape. This proactive adjustment prevents dry spots and ensures efficient water usage.
Tools and Materials Needed
Now that you understand the common issues, let’s look at the tools and materials you’ll need to perform these repairs on your sprinkler system. For troubleshooting leaks and conducting system upgrades, precision, and the right equipment are key.
Firstly, you’ll need a set of adjustable wrenches and a set of channel locks to handle the tightening and loosening of fittings. A high-quality PVC or poly pipe cutter is essential for clean, straight cuts, ensuring that all connections are secure and leak-free. For detecting and addressing leaks effectively, invest in a soil probe to help you locate the exact position of underground pipes without unnecessary digging.
Next, keep a stock of various PVC couplings, tees, and elbows. These are crucial for making necessary adjustments and repairs to the piping layout. For system upgrades, ensure you have updated controllers and sensors that can help in optimizing water usage and improving the efficiency of your system.
Lastly, Teflon tape and pipe dope are indispensable for sealing threaded joints, crucial in preventing future leaks. Having these tools and materials on hand will empower you to maintain and enhance your sprinkler system successfully.
Repairing Sprinkler Heads
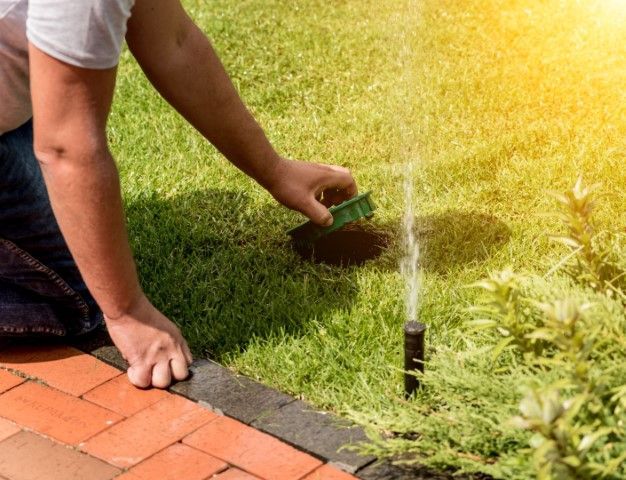
When you’re facing issues with your sprinkler system, the first step is to identify faulty sprinkler heads that may be clogged or damaged. Once pinpointed, you’ll need to replace these heads with the correct type and size to ensure optimal functionality. Finally, adjusting the spray patterns is crucial for achieving uniform water distribution and preventing over- or under-watering in your garden.
Identifying Faulty Sprinkler Heads
Identifying faulty sprinkler heads is a critical step in ensuring your irrigation system operates efficiently and effectively. You’ll need to employ precise troubleshooting techniques and implement preventative measures to diagnose issues accurately. Let’s delve into the signs you should look for and the steps you can take to identify any malfunctioning sprinkler heads in your system.
When examining your sprinkler heads, consider these key indicators:
– Irregular Water Patterns: If you notice uneven water distribution or dry patches, the sprinkler heads might be clogged or damaged.
– Sputtering Heads: A sprinkler head that sputters or emits water inconsistently often has an obstruction or a broken component.
– Visible Damage: Check for cracks, chips, or any signs of physical damage on the sprinkler heads.
– Pooling Water: Excessive water gathering around the sprinkler heads can indicate leaks or improper installation.
– Non-activation: Heads that do not activate with the rest of the system may be malfunctioning or incorrectly connected.
Replacing Sprinkler Heads
Once you’ve identified faulty sprinkler heads, replacing them becomes an essential task to maintain the system’s efficiency and effectiveness. You’ll need to embrace precise installation techniques to ensure optimal function and minimize water waste, directly impacting environmental conservation.
Start by selecting the correct replacement head that matches your system’s specifications. This includes the spray pattern and pressure requirements. Incorrect selection can lead to poor coverage and excess water usage, defeating efforts in water conservation.
Turn off the water supply before beginning the work to avoid accidents and ensure a dry work area. Carefully dig around the existing sprinkler head to avoid damaging the connecting pipes. Unscrew the faulty head from its fitting and check the threads on the riser for damage. If they’re intact, screw the new head onto the riser, hand-tightening to ensure a snug fit without over-tightening, which can damage the threads.
After installation, turn on the water briefly to flush out any debris that may have entered the pipes during the replacement process. This troubleshooting solution prevents clogs and ensures the new head operates at peak efficiency. Carefully replace the soil and sod around the new head, taking care not to disturb its position and angle.
Adjusting Spray Patterns
Adjusting the spray patterns of your sprinkler heads is crucial for ensuring optimal irrigation coverage and water efficiency. Proper adjustments not only promote water conservation but also enhance the effectiveness of your sprinkler system. By fine-tuning the spray angles, you can ensure that water is distributed evenly and only where it’s needed, reducing waste and promoting healthier plant growth.
Here are some key steps to adjust your sprinkler heads effectively:
– Identify the Type of Sprinkler Head: Different heads, such as rotors or spray heads, require different methods of adjustment.
– Check for Blockages: Remove any debris that might be obstructing the nozzle to ensure an even spray pattern.
– Adjust the Spray Angle: Rotate the head to cover the intended area without over spraying onto sidewalks or buildings.
– Modify the Spray Distance: Use a screwdriver to turn the adjustment screw on the head, increasing or decreasing the throw as needed.
– Conduct Seasonal Maintenance: Regularly check and adjust spray patterns to compensate for changes in the landscape and seasonal variations in water needs.
Fixing Valve Issues
To effectively address valve malfunctions in your sprinkler system, start by examining the solenoid for any signs of damage or corrosion. This component is crucial as it electromagnetically controls the opening and closing of the valve. If you notice any visible wear or rust, it’s likely time to replace the solenoid. After checking the solenoid, ensure that the valve’s diaphragm isn’t torn or blocked. A compromised diaphragm can severely affect the valve’s function, leading to leaks or failure in water distribution.
Continuing with your valve troubleshooting, it’s essential to apply these troubleshooting techniques methodically. Check for any debris that might be clogging the valve. Sometimes, small particles or sediment can accumulate and prevent the valve from sealing properly. Carefully disassemble the valve if necessary, clean all accessible parts, and reassemble it, ensuring all connections are secure and tight.
If the issue persists, consider the wiring connections to the solenoid. Loose or corroded wires can disrupt the electrical signal, causing the valve to behave erratically. If you’re not confident in handling electrical components, it may be wise to consult with a professional. Remember, precise and methodical troubleshooting is key to effectively resolving valve issues in your sprinkler system.
Adjusting System Pressure
To accurately adjust your sprinkler system’s pressure, you’ll first need to identify any pressure inconsistencies that may be affecting performance. Understanding the optimal pressure settings for your specific system is crucial for ensuring efficient water distribution and minimizing waste. You’ll find that maintaining these settings not only improves the health of your lawn but also conserves water over time.
Identify Pressure Issues
Low water pressure can drastically reduce the efficiency of your sprinkler system, so it’s crucial to correctly adjust the pressure to optimize performance. Troubleshooting pressure and water flow issues in your system begins with understanding and identifying key signs of pressure problems. Here are steps you can take to diagnose and address these issues:
– Check for Leaks: Inspect the entire system for any visible signs of leakage. Even a small leak can lead to significant pressure loss.
– Inspect the Valves: Ensure all valves are fully open as partially closed valves can restrict water flow, affecting the pressure.
– Evaluate the Backflow Preventer: Sometimes, the settings on the backflow preventer are not correct, which can impede water flow and pressure.
– Assess the Water Meter Settings: Incorrect settings can restrict the flow rate; ensure these are set according to your system’s requirements.
– Monitor the Pressure Gauge: If your system includes a pressure gauge, use it to check real-time water pressure levels. This will help you determine if the pressure is within a normal range or if adjustments are needed.
Optimal Pressure Settings
Once you’ve identified and corrected any pressure issues, adjusting the system to the optimal pressure settings will enhance your sprinkler system’s efficiency and longevity. You’ll need a reliable pressure gauge to accurately measure the water pressure in your system. This is crucial for the next steps.
Start by attaching the pressure gauge at a point that represents the average pressure in the system. Typically, this would be at a hose bib or directly on a sprinkler line. Turn on the system and note the pressure reading. It’s essential to ensure that the pressure isn’t too high, which can cause misting, inefficient watering, and potential damage to the system components, or too low, which results in inadequate water coverage.
For most residential systems, the optimal pressure setting usually ranges between 30 and 50 psi. Adjust the system pressure regulator to achieve this range. Keep in mind, different zones in your garden might require slight variations in pressure due to differences in elevation or sprinkler head types.
Use these troubleshooting tips if you encounter any irregularities in pressure after your adjustments: check for leaks, ensure that all valves are fully open, and verify that no pipes are clogged. Regular monitoring and necessary irrigation adjustments will maintain the desired flow rate and ensure efficient water use.
Routine Maintenance Tips
Regularly inspect your sprinkler system’s heads and valves to ensure optimal functionality and prevent costly repairs. It’s crucial to adopt a proactive approach towards maintenance to extend the lifespan of your system. Engaging in thorough inspections allows you to catch issues such as clogs, leaks, or wear and tear before they escalate.
Implement these practical steps to maintain your sprinkler system effectively:
– Winterization Process: Before the cold sets in, drain the system to prevent freezing and potential damage. This step is critical to avoid cracking in the piping.
– Summer Maintenance: Adjust the sprinkler heads and recalibrate the system to cope with increased water usage and higher temperatures during summer months.
– Water Conservation Techniques: Install rain sensors and employ efficient watering schedules to minimize water usage while maintaining lawn health.
– Regular Cleaning: Clean filter screens and nozzles regularly to remove debris and ensure even water distribution.
– Troubleshooting Techniques: Familiarize yourself with common issues like low pressure or uneven coverage and learn the basic fixes.
Adhering to these guidelines not only enhances the efficiency of your sprinkler system but also contributes to its durability and performance, ensuring your landscape remains lush and well-irrigated.
- Avoid These 5 Common Irrigation Blunders Every Homeowner Makes
- Your Go-To Guide for Picking the Perfect Sprinkler System for a Lush Lawn: Handy Tips and Tricks
- Impact of Climate on Irrigation System Design and Operation
- The Role of Soil Moisture Sensors in Irrigation Efficiency
- Cost-Effective Irrigation Solutions for Small Gardens